Step 1
In a small microwaveable bowl or measuring cup, add the cold water. Sprinkle the gelatin over the surface and gently whisk together with a fork to ensure all granules are wet. Set aside to bloom; at least 5 minutes.
Step 2
In a medium bowl that has been chilled, with a large whisk or a hand mixer (that has also been chilled), whip the ½ cup (125 ml) of the cold heavy cream until thickened (leave the remaining tablespoon of heavy cream at room temperature). Add in the Redpath® Icing Sugar and vanilla extract. Whip until soft peaks are just beginning to form.
Step 3
Place the bloomed gelatin into the microwave and heat in 5- to 10-second increments; do not boil. Stir and check after each interval to see if the gelatin has completely dissolved; cool until warm. Stir the room temperature heavy cream into the warm gelatin. Ensure the gelatin remains in liquid form. (If gelatin sets or becomes lumpy, microwave for 3 to 5 seconds or just until it melts. Cool again to room temperature.) Stir 3 tablespoons (45 ml) of the whipped cream into the gelatin mixture.
Step 4
Place the bowl with the whipped cream on a damp dishcloth or paper towel. This will prevent the bowl from moving across the table as you whisk with one hand and drizzle with the other. Slowly drizzle the tempered gelatin mixture into the bowl of whipped cream while whipping the cream until it begins to stiffen; do not over-whip.
Step 5
Cover and place into the fridge to chill while making the cake.
Step 1
Preheat oven to 350°F (177°C). Lightly grease and line the bottom and sides of a 9 x 13-inch baking pan with parchment paper.
Step 2
In a bowl, whisk together the cake flour, cornstarch, baking powder, salt, and baking soda until free of lumps.
Step 3
In a large bowl, using a hand mixer or a large whisk, beat together the egg yolks, ¼ cup (50 grams) of the Redpath® Granulated Sugar, canola oil, milk, pure vanilla extract, and pure almond extract, until sugar is dissolved and egg yolk mixture is thickened and pale in colour; 3 minutes. Sift the dry ingredients evenly over the surface of the yolk mixture. With a large rubber spatula, gently fold in until no flour streaks remain; do not overmix. Set aside.
Step 4
Add egg whites to the bowl of a stand mixer fitted with the whisk attachment or a large bowl using a hand mixer. Whisk on medium speed until foamy. Add in lemon juice, and continue whisking until egg whites are opaque, white, and the “bubbles” of the egg whites are small and uniform. When this happens, gradually add the remaining ½ cup (100 grams) of sugar in a slow but steady stream.
Step 5
Once all the sugar is added, increase speed to medium-high and whip to medium peak; whites should be glossy. To test, lift the whisk from the meringue; it should hold a peak but have a curved tip; do not over-whip to stiff peaks as this may encourage cracks to form when rolling up the cake.
Step 6
Add and quickly fold in ⅓ of the egg whites to the yolk mixture; this will lighten the yolk mixture, making it easier to fold in the remaining egg whites. Add remaining whites to the yolk mixture, and gently fold in until no egg white streaks remain, and batter is smooth.
Step 7
Pour and spread the batter into the prepared pan with an offset spatula, ensuring an even thickness. Drop the pan a few times onto a flat work surface to rid batter of any large air pockets. Place pan into the preheated oven. Bake until top is golden in colour and not sticky to the touch; 13 to 16 minutes or until a skewer inserted into the center comes out clean, or when the sponge is gently pressed, it slowly springs back.
Step 8
Remove from the oven and let cool in pan; 5 minutes. After 5 minutes, place a wire cooling rack over the pan and carefully flip the cake onto the cooling rack. Slowly and carefully, peel away the parchment paper. With a small offset spatula or the back of a butter knife, gently scrape the browned parts of the cake, exposing the lighter-coloured cake underneath (see Chef’s Tips).
Step 9
Place a piece of parchment paper onto the cake’s surface, place the bottom of a baking sheet, cutting board, or another wire cooling rack (larger than the cake) onto the parchment paper and flip the cake over.
Step 10
Using a sharp serrated bread knife, trim away the “hardened” sides of the cake (between ⅛- to ¼-inch from all four sides). On the shorter edge, furthest away from the edge of the work surface, make an angled cut (approximately at a 15- to 45-degree angle); this will help the cake lie flat on a platter after it has been rolled. On the opposite end, with the help of a ruler, measure an inch from the cake’s edge. Make a shallow cut parallel to the edge, about ⅛- to ¼-inch deep; do not go deeper than halfway through the sponge. Make 3 additional scores, all an inch apart, to help the cake roll up easier and prevent the cake from cracking.
Step 11
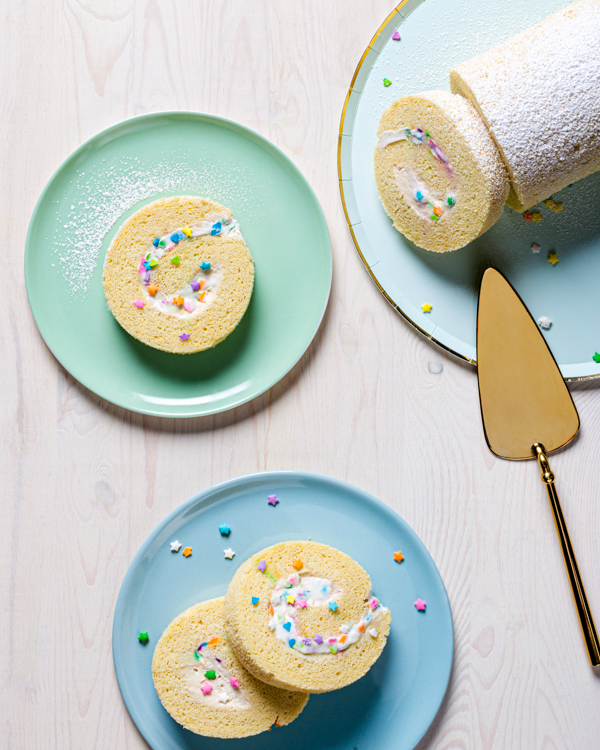
Cool cake until lukewarm; do not cool completely. It should be cool enough not to melt the whipped cream (refer to Chef’s Tips). Spread a layer of the stabilized whipped cream evenly over the surface, placing more of the whipped cream closer to the scored edge and spreading it thinner towards the angled side; filling will spread slightly as it gets rolled up. Sprinkle the surface of the whipped cream with “quins” and/or “jimmies.”
Step 12
With the help of the parchment paper, roll the cake, gently pushing the cake onto itself until it reaches the angled end. Roll and position the cake into the middle of the parchment paper (seam side down). Drape the parchment over the roll. Holding the short edges of the parchment paper against the work surface, let go of the top sheet while holding the bottom sheet firmly against the work surface. Gently push a bench scraper or the edge of a ruler, at a slight angle, along the top sheet of parchment and up against the roll’s bottom edge, where the cake meets the work surface, to tighten up the cake roll. Remove parchment paper and carefully place the cake roll onto a layer of plastic wrap. If needed, fill and spread the ends of the roll with whipped cream. With the help of the plastic wrap, roll cake while gently “shaping” it into a cylinder. Place into the fridge to firm up and chill completely; at least 3 hours.
Step 13
Remove cake from fridge about 15 minutes before serving. Dust with Redpath® Icing Sugar and trim edges, if desired. With a sharp serrated knife dipped into hot water, and dried with a clean kitchen towel, slice roll into 1-inch thick slices.
*Ensure bowl and attachments for whipping the filling are chilled in the freezer for at least 15 minutes before using.
*Use fridge-cold heavy cream for the best results when whipping.
*Eggs are best separated when cold but whip better at room temperature.
*If cake flour is unavailable, substitute 1 cup (125 grams) all-purpose flour and remove 2 tablespoons (16 grams) of flour and replace with 2 tablespoons (16 grams) cornstarch. Whisk together. Prepare and use the required amount specified in the recipe.
*Ensure bowl and whisk attachment are free from any traces of fat (e.g. grease, oil, yolk) before beating egg whites.
*Whisking and sifting in the dry ingredients ensures that the cake is free of lumps and is light and fluffy.
* You can substitute any neutral oil for the canola oil (e.g. vegetable, sunflower, safflower, grapeseed, or avocado oil).
* For a nut-free cake, omit the almond extract. Increase vanilla extract to 1 tablespoon (15 ml).
*To match an event or celebration, a few drops of gel food colouring can be added. Thoroughly whisk the food colouring into the yolk mixture before sifting in the dry ingredients.
*If desired, gently scrape off both the top and the bottom of the cake for a “cleaner” look.
*Do not use nonpareils or “hundreds and thousands” for the filling, as the colours will immediately bleed. “Quins” are sprinkles that look like sequins or confetti and are flat or disc-like and can come in different shapes. Quins and rod sprinkles come in an array of colours that are less prone to bleeding than the nonpareils.
*To check if the cake is cool enough to spread the filling, place a small amount of the whipped cream in the centre (the middle of the cake will be warmer than the edges) of the cake. If the whipped cream starts wilting or melting, scrape off the filling and wait another few minutes before trying again.
*If there is any leftover whipped cream, you can use it to pipe rosettes or any desired design on the top of the roll just before serving

